
SpringMVC主要启动流程
前言
本章重点是了解springMvc主流程做了什么,有些细节不是很详细,它源码也不是晦涩难懂的程度。
SpringMvc启动说明
Tomcat启动的一个过程(简单可能不准确,主要是了解Tomcat做了什么,其实springMvc的初始化是和Tomcat启动挂钩的,所以还是有必要了解的):
ContextLoaderListener , ServletContextListener ,webappServiceLoader, DispatcherServlet ,
Tomcat启动会解析server.xml,生成
servletContext(servlet上下文),解析
web.xml,这时会将Tomcat的web.xml和应用的web.xml进行合并,然后将里面配置的ContextLoaderListener和DispatcherServlet读取到容器里后查找Tomcat下的jar包,查找
ServletContainerInitializer接口实现类,该接口是提供给应用程序进行初始化的,springMvc有实现该接口(springMVC是在classpath下存在META-INF/services/javax.servlet.ServletContainerInitializer这样的一个文件),但并没有做其他操作,通过实现该接口,并且配置在/META-INF/services/下,就能被Tomcat读取得到,并执行,具体的加载逻辑是在WebappServiceLoader通过web.xml里的监听器
ContextLoaderListener进行spring容器的初始化最后会通过
DisapatcherServlet初始化servlet容器,web.xml提供了默认的DefaultServlet``JspServlet也在这里执行
还有一个知识点:
servlet-mapping 的优先级如下:
/* > / > *.jsp
在Tomcat中有默认的web.xml,里面配置了两个处理器defaultServlet和JspServlet,分别是处理静态资源和jsp的,
这两个默认的作为缺省配置,当我们项目中没有配置时,Tomcat的默认配置会将其连接,
所以在项目中的配置,需要注意servlet-mapper不要配置成/和/*,因为我们项目中配置的是DispatcherServlet是处理controller那一类的请求,如果配置了/*,优先级高,会把默认的DefualtServlet的也拦截掉,否则都会走DispatcherServlet,当找不到资源时,它就不会走DefaultServlet,相当于少了一个默认的servlet,
容器初始化
ContextLoaderListener
springMvc中有一个监听器ContextLoaderListenerTomcat会调用这个初始化容器initWebApplicationContext
位置:org.springframework.web.context.ContextLoader#initWebApplicationContext
 public WebApplicationContext initWebApplicationContext(ServletContext servletContext) {
     // 1. 判断是否存在父容器,因为他需要初始化,当然已经存在父容器就是有问题的
        if (servletContext.getAttribute(WebApplicationContext.ROOT_WEB_APPLICATION_CONTEXT_ATTRIBUTE) != null) {
            throw new IllegalStateException("Cannot initialize context because there is already a root application context present - check whether you have multiple ContextLoader* definitions in your web.xml!");
        } else {
            // 记录日志
            servletContext.log("Initializing Spring root WebApplicationContext");
            Log logger = LogFactory.getLog(ContextLoader.class);
            if (logger.isInfoEnabled()) {
                logger.info("Root WebApplicationContext: initialization started");
            }
            // 记录时间
            long startTime = System.currentTimeMillis();

            try {
                // 创建父容器,也可以说是spring容器
                if (this.context == null) {
                    this.context = this.createWebApplicationContext(servletContext);
                }

                if (this.context instanceof ConfigurableWebApplicationContext) {
                    ConfigurableWebApplicationContext cwac = (ConfigurableWebApplicationContext)this.context;
                    if (!cwac.isActive()) {
                        if (cwac.getParent() == null) {
                            ApplicationContext parent = this.loadParentContext(servletContext);
                            cwac.setParent(parent);
                        }
                        // 接下来看这个方法,设置并初始化spring容器(bean扫描、实例化、后置处理器、国际化等)
                        this.configureAndRefreshWebApplicationContext(cwac, servletContext);
                    }
                }
                // 将如容器设置到servlet上下文
                servletContext.setAttribute(WebApplicationContext.ROOT_WEB_APPLICATION_CONTEXT_ATTRIBUTE, this.context);
                ClassLoader ccl = Thread.currentThread().getContextClassLoader();
                if (ccl == ContextLoader.class.getClassLoader()) {
                    currentContext = this.context;
                } else if (ccl != null) {
                    currentContextPerThread.put(ccl, this.context);
                }

                if (logger.isInfoEnabled()) {
                    long elapsedTime = System.currentTimeMillis() - startTime;
                    logger.info("Root WebApplicationContext initialized in " + elapsedTime + " ms");
                }

                return this.context;
            } catch (Error | RuntimeException var8) {
                logger.error("Context initialization failed", var8);
                servletContext.setAttribute(WebApplicationContext.ROOT_WEB_APPLICATION_CONTEXT_ATTRIBUTE, var8);
                throw var8;
            }
        }
    }
创建spring容器
创建spring容器的方法createWebApplicationContext如下
    protected WebApplicationContext createWebApplicationContext(ServletContext sc) {
        // 读取容器类
        Class<?> contextClass = this.determineContextClass(sc);
        if (!ConfigurableWebApplicationContext.class.isAssignableFrom(contextClass)) {
            throw new ApplicationContextException("Custom context class [" + contextClass.getName() + "] is not of type [" + ConfigurableWebApplicationContext.class.getName() + "]");
        } else {
            // 实例化
            return (ConfigurableWebApplicationContext)BeanUtils.instantiateClass(contextClass);
        }
    }
看看底层怎么读取容器类的
    protected Class<?> determineContextClass(ServletContext servletContext) {
        // 从servlet上下文获取容器类全名
        String contextClassName = servletContext.getInitParameter("contextClass");
        if (contextClassName != null) {
            try
                // 不等于空就反射
                return ClassUtils.forName(contextClassName, ClassUtils.getDefaultClassLoader());
            } catch (ClassNotFoundException var4) {
                throw new ApplicationContextException("Failed to load custom context class [" + contextClassName + "]", var4);
            }
        } else {
        // 等于空,就从默认配置中获取
            contextClassName = defaultStrategies.getProperty(WebApplicationContext.class.getName());

            try {
                return ClassUtils.forName(contextClassName, ContextLoader.class.getClassLoader());
            } catch (ClassNotFoundException var5) {
                throw new ApplicationContextException("Failed to load default context class [" + contextClassName + "]", var5);
            }
        }
    }
先是从spring容器中查找容器类,
如果有就反射获取
如果没有就从默认位置读取,看下面这句
java contextClassName = defaultStrategies.getProperty(WebApplicationContext.class.getName());
它存在一个default,查找所以引用的地方,它是在static块下,直接加载的,可以看到它是读取字节码文件目录下的ContextLoader.properties
    static {
        try {
            ClassPathResource resource = new ClassPathResource("ContextLoader.properties", ContextLoader.class);
            defaultStrategies = PropertiesLoaderUtils.loadProperties(resource);
        } catch (IOException var1) {
            throw new IllegalStateException("Could not load 'ContextLoader.properties': " + var1.getMessage());
        }

        currentContextPerThread = new ConcurrentHashMap(1);
    }
查看位置
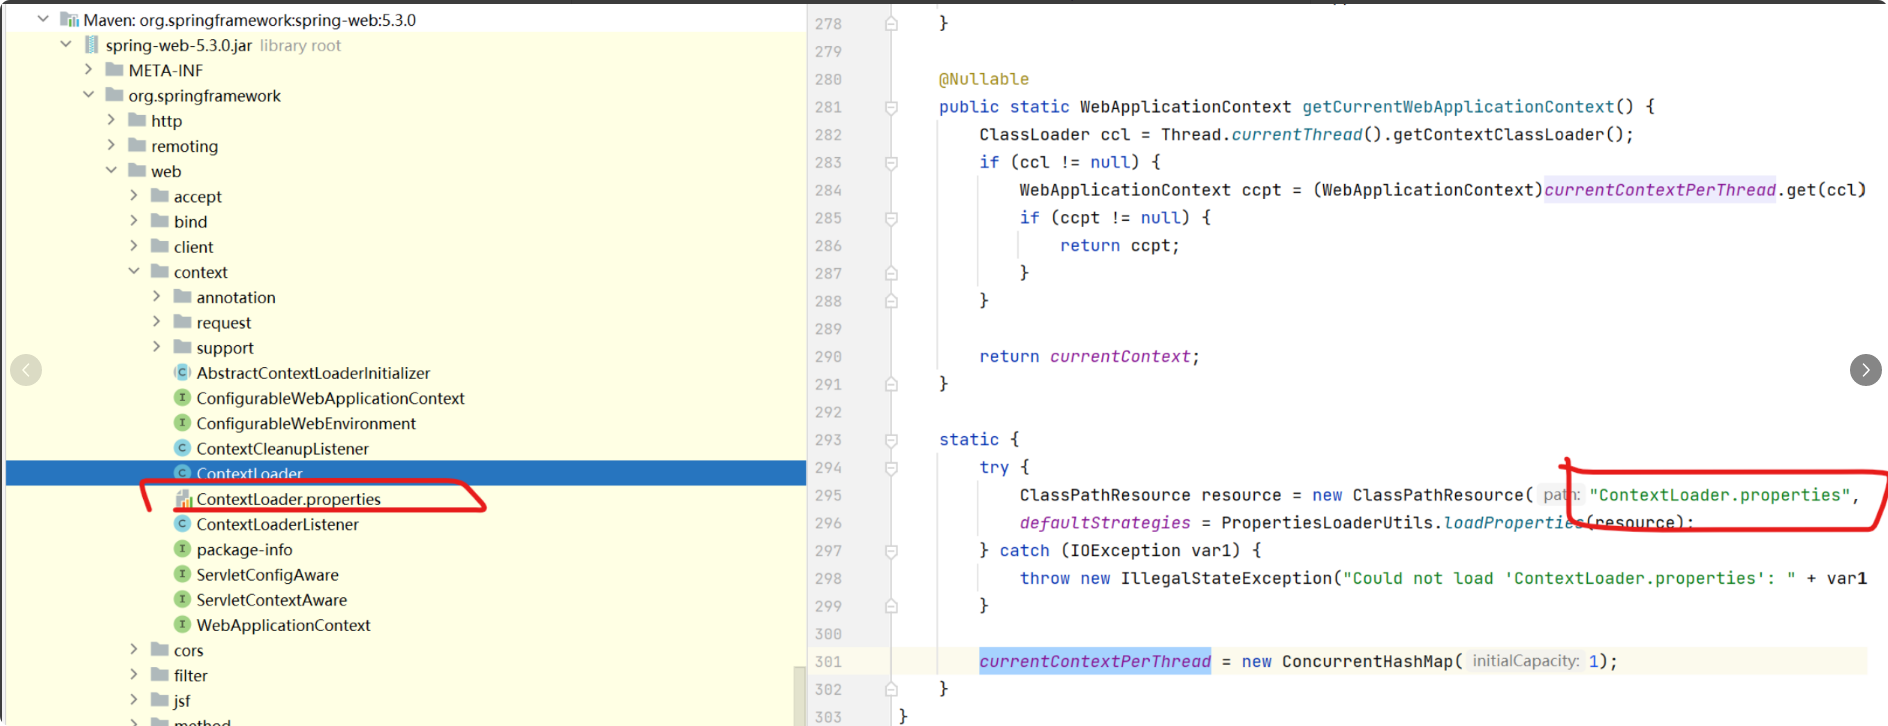
#ContextLoader.properties
org.springframework.web.context.WebApplicationContext=org.springframework.web.context.support.XmlWebApplicationContext
该文件配置的类是XmlWebApplicationContext,我们直接定位过去
再回到org.springframework.web.context.ContextLoader#initWebApplicationContext
                if (this.context instanceof ConfigurableWebApplicationContext) {
                    ConfigurableWebApplicationContext cwac = (ConfigurableWebApplicationContext)this.context;
                    if (!cwac.isActive()) {
                        if (cwac.getParent() == null) {
                            ApplicationContext parent = this.loadParentContext(servletContext);
                            cwac.setParent(parent);
                        }
                        // 接下来看这个方法,设置并初始化spring容器
                        this.configureAndRefreshWebApplicationContext(cwac, servletContext);
                    }
                }
 protected void configureAndRefreshWebApplicationContext(ConfigurableWebApplicationContext wac, ServletContext sc) {
        String configLocationParam;
     // 设置id
        if (ObjectUtils.identityToString(wac).equals(wac.getId())) {
            configLocationParam = sc.getInitParameter("contextId");
            if (configLocationParam != null) {
                wac.setId(configLocationParam);
            } else {
                wac.setId(ConfigurableWebApplicationContext.APPLICATION_CONTEXT_ID_PREFIX + ObjectUtils.getDisplayString(sc.getContextPath()));
            }
        }
     // 将spring容器作为父容器,将servlet容器作为子容器设置
        wac.setServletContext(sc);
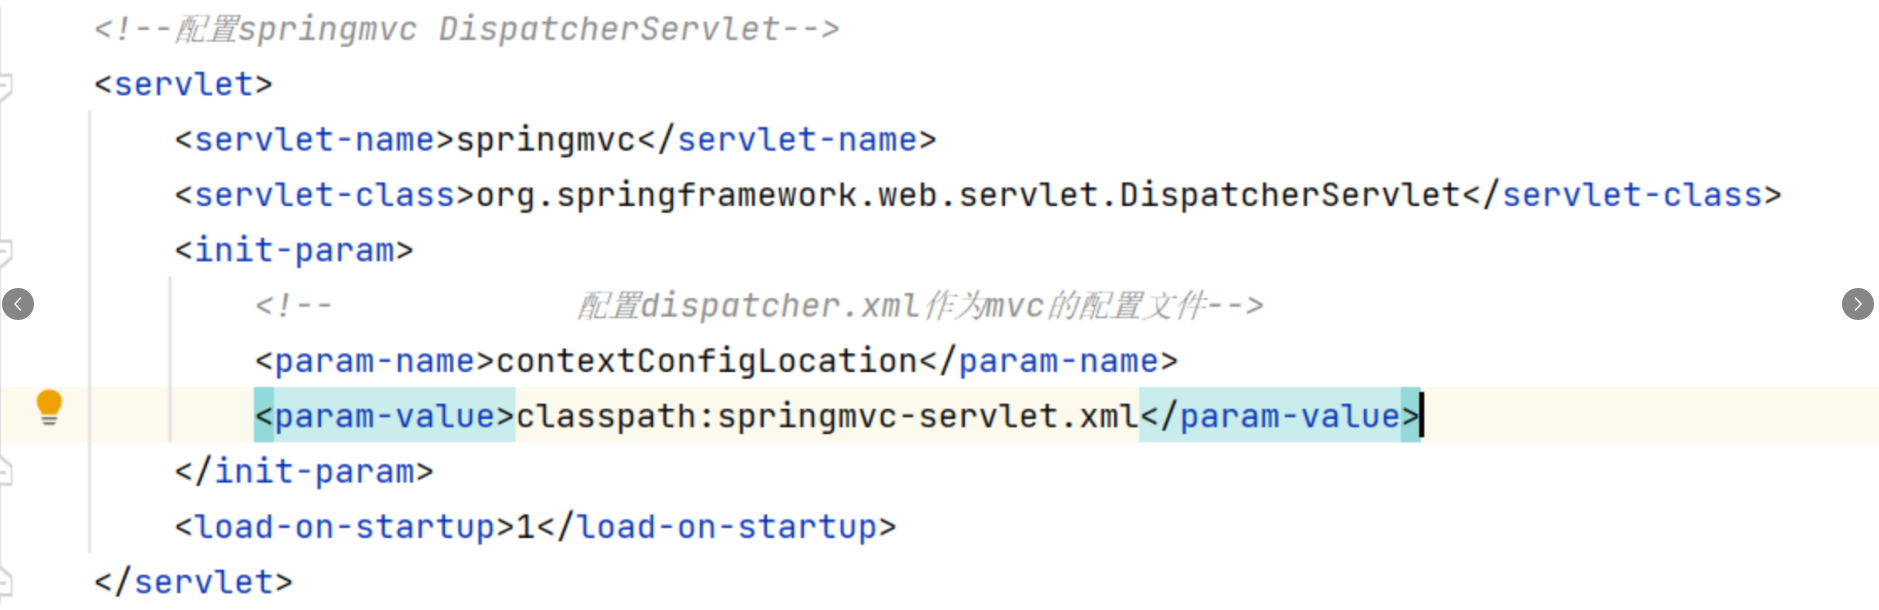
     // 这里的`contextConfigLocation`就是web.xml配置里的那个`contextConfigLocation`,下面给了截图
        configLocationParam = sc.getInitParameter("contextConfigLocation");
        if (configLocationParam != null) {
            wac.setConfigLocation(configLocationParam);
        }

     // 初始化spring容器的配置到servlet容器
        ConfigurableEnvironment env = wac.getEnvironment();
        if (env instanceof ConfigurableWebEnvironment) {
            ((ConfigurableWebEnvironment)env).initPropertySources(sc, (ServletConfig)null);
        }
     // 初始化操作
        this.customizeContext(sc, wac);
     // spring 的启动时调用的初始方法,这个在spring篇章讲过的AnnotationConfigApplicationContext类里
     // 就是做了扫描bean,创建bean,postProcesser,国际化等操作
        wac.refresh();
    }
子容器初始化
DispatcherServlet继承HttpServletBean,容器初始化由init()方法完成。
位置:org.springframework.web.servlet.HttpServletBean#init
public final void init() throws ServletException {
    // 这里是将servlet的配置信息设置的pvs,往细的看扯到了Tomcat的过程, ̄□ ̄||,之后在仔细看Tomcat
        PropertyValues pvs = new ServletConfigPropertyValues(this.getServletConfig(), this.requiredProperties);
        if (!pvs.isEmpty()) {
            try {
                // beanWrapper包装该类
                BeanWrapper bw = PropertyAccessorFactory.forBeanPropertyAccess(this);
                // 创建servlet资源加载器
                ResourceLoader resourceLoader = new ServletContextResourceLoader(this.getServletContext());
                // 根据名字看是一个编辑器,在这里的作用是将变量替换,环境加载等操作
                // ResourceEditor 资源编辑器,它是对如:file:E:/xxx/xxx,classpaht:xxxx, ${xxx}等这样的资源进行处理
                bw.registerCustomEditor(Resource.class, new ResourceEditor(resourceLoader, this.getEnvironment()));
                // 这里并没有实现
                this.initBeanWrapper(bw);
                // 这里的方法在spring中也有,就是将属性值设置进去
                bw.setPropertyValues(pvs, true);
            } catch (BeansException var4) {
                if (this.logger.isErrorEnabled()) {
                    this.logger.error("Failed to set bean properties on servlet '" + this.getServletName() + "'", var4);
                }

                throw var4;
            }
        }
        // 初始化改servletBean 重点看这个方法,这个是让子类去实现的
        this.initServletBean();
    }
initServletBean()实现,也就是FrameworkServlet
    protected final void initServletBean() throws ServletException {
        // 打日志
        getServletContext().log("Initializing Spring " + getClass().getSimpleName() + " '" + getServletName() + "'");
        if (logger.isInfoEnabled()) {
            logger.info("Initializing Servlet '" + getServletName() + "'");
        }
        // 时间记录
        long startTime = System.currentTimeMillis();

        try {
            // 初始化web容器,也就是servlet容器,上文我说的是servlet容器,一样的
            this.webApplicationContext = initWebApplicationContext();
            // 这里是空实现
            initFrameworkServlet();
        }

        // 下面就是日志一堆
        catch (ServletException | RuntimeException ex) {
            logger.error("Context initialization failed", ex);
            throw ex;
        }

        if (logger.isDebugEnabled()) {
            String value = this.enableLoggingRequestDetails ?
                    "shown which may lead to unsafe logging of potentially sensitive data" :
                    "masked to prevent unsafe logging of potentially sensitive data";
            logger.debug("enableLoggingRequestDetails='" + this.enableLoggingRequestDetails +
                    "': request parameters and headers will be " + value);
        }

        if (logger.isInfoEnabled()) {
            logger.info("Completed initialization in " + (System.currentTimeMillis() - startTime) + " ms");
        }
    }
位置:org.springframework.web.servlet.FrameworkServlet#initWebApplicationContext
    protected WebApplicationContext initWebApplicationContext() {
        // 查找当前servlet上下文对应的跟容器(spring容器)
        WebApplicationContext rootContext =
                WebApplicationContextUtils.getWebApplicationContext(getServletContext());
        // 暂定servlet容器对象为wac
        WebApplicationContext wac = null;

        if (this.webApplicationContext != null) {
            // 走这里是构造器实例化就已经传入的
            wac = this.webApplicationContext;
            if (wac instanceof ConfigurableWebApplicationContext) {
                ConfigurableWebApplicationContext cwac = (ConfigurableWebApplicationContext) wac;
                if (!cwac.isActive()) {
                    // 这里它有一个标志 active 这个标志着实例化完,并设置好了web容器需要的环境及工具
                    if (cwac.getParent() == null) {
                    // 如果目前获取到的servlet容器是没有父容器的,那么就把刚刚获取到的设置进去
                        cwac.setParent(rootContext);
                    }
                    // 开始刷新(设置各种容器环境:bean的扫描、注册、国际化等)
                    // 注意,这里在刷新完(设置完)会发布一个`ContextRefreshedEvent`事件
                    configureAndRefreshWebApplicationContext(cwac);
                }
            }
        }

        if (wac == null) {
        // 构造器没有传入,它就会到servlet 上下文中找,然后返回
            wac = findWebApplicationContext();
        }
        if (wac == null) {
            // 如果到这里还没有,就自己创建一个,并刷新(设置容器环境)
            // 注意,这里在刷新完(设置各种容器环境:bean的扫描、注册、国际化等)会发布一个`ContextRefreshedEvent`事件
            wac = createWebApplicationContext(rootContext);
        }

        if (!this.refreshEventReceived) {
            // 这里判断如果没有刷新,就会在刷新一次,这里再刷新,和`ContextRefreshedEvent`事件监听器里的一样,都是调用子类`DispatcherServlet`的实现方法
            // 事件监听器位置在:org.springframework.web.servlet.FrameworkServlet.ContextRefreshListener#onApplicationEvent
            synchronized (this.onRefreshMonitor) {
                onRefresh(wac);
            }
        }

        if (this.publishContext) {
            // Publish the context as a servlet context attribute.
            String attrName = getServletContextAttributeName();
            getServletContext().setAttribute(attrName, wac);
        }

        return wac;
    }
onRefresh(wac);实际执行是下面这段代码
位置:org.springframework.web.servlet.DispatcherServlet#initStrategies
可以看到它初始化了很多解析器:多文件上传、国际化、动态样式、映射处理器、映射处理器适配器、异常处理器、视图解析器…
    protected void initStrategies(ApplicationContext context) {
        initMultipartResolver(context);
        initLocaleResolver(context);
        initThemeResolver(context);
        initHandlerMappings(context);
        initHandlerAdapters(context);
        initHandlerExceptionResolvers(context);
        initRequestToViewNameTranslator(context);
        initViewResolvers(context);
        initFlashMapManager(context);
    }
在上面的demo中我们模拟了HandlerMappings和handlerAdapters,我们着重看一下。
请求流程
当请求过来时,tomcat会之间调用DispatcherServlet来处理,位置在:org.apache.catalina.core.ApplicationFilterChain#internalDoFilter

也就对应的是:javax.servlet.http.HttpServlet#service(javax.servlet.http.HttpServletRequest, javax.servlet.http.HttpServletResponse)
它这个方法代码就没必要贴出来了,它这个具体的作用就是,请求校验分发的,get的方法调用doGet,post调用doPost这样
创建一个请求处理器
在springMvc中,接口处理器:
@Controller @RequestMapping
Controller 接口
HttpRequestHandler
方式一:继承HttpServlet,
重写doGet或者doPost以处理请求,不过这个是直接用的Tomcat的servlet,所以需要在web.xml中配置servlet-mapping
public class IndexController2 extends HttpServlet {
    private static final long serialVersionUID = -2964194399437247271L;

    @Override
    protected void doGet(HttpServletRequest req, HttpServletResponse resp) throws ServletException, IOException {
        System.out.println("in httpServlet");
        super.doGet(req, resp);
    }
}
    <servlet>
        <servlet-name>indexController2</servlet-name>
        <servlet-class>com.liry.controller.IndexController2</servlet-class>
    </servlet>
    <servlet-mapping>
        <servlet-name>indexController2</servlet-name>
        <url-pattern>/index2.html</url-pattern>
    </servlet-mapping>
方式二实现Controller接口:
实现Controller接口
public class IndexController3 implements Controller {
    @Override
    public ModelAndView handleRequest(HttpServletRequest request, HttpServletResponse response) throws Exception {
        System.out.println("in controller");
        ModelAndView result = new ModelAndView();
        result.setViewName("index");
        return result;
    }
}
然后配置映射
配置映射也是两种方式:
@Component("/index3.html"):注解方式定义beanName未url
<bean id="/index3.html" class="com.liry.controller.IndexController3"/>这种方式是经典的xml方式配置
虽说是两种,其实就是一种,两个是一样的,将controller作为一个bean存起来
方式三 注解方式:
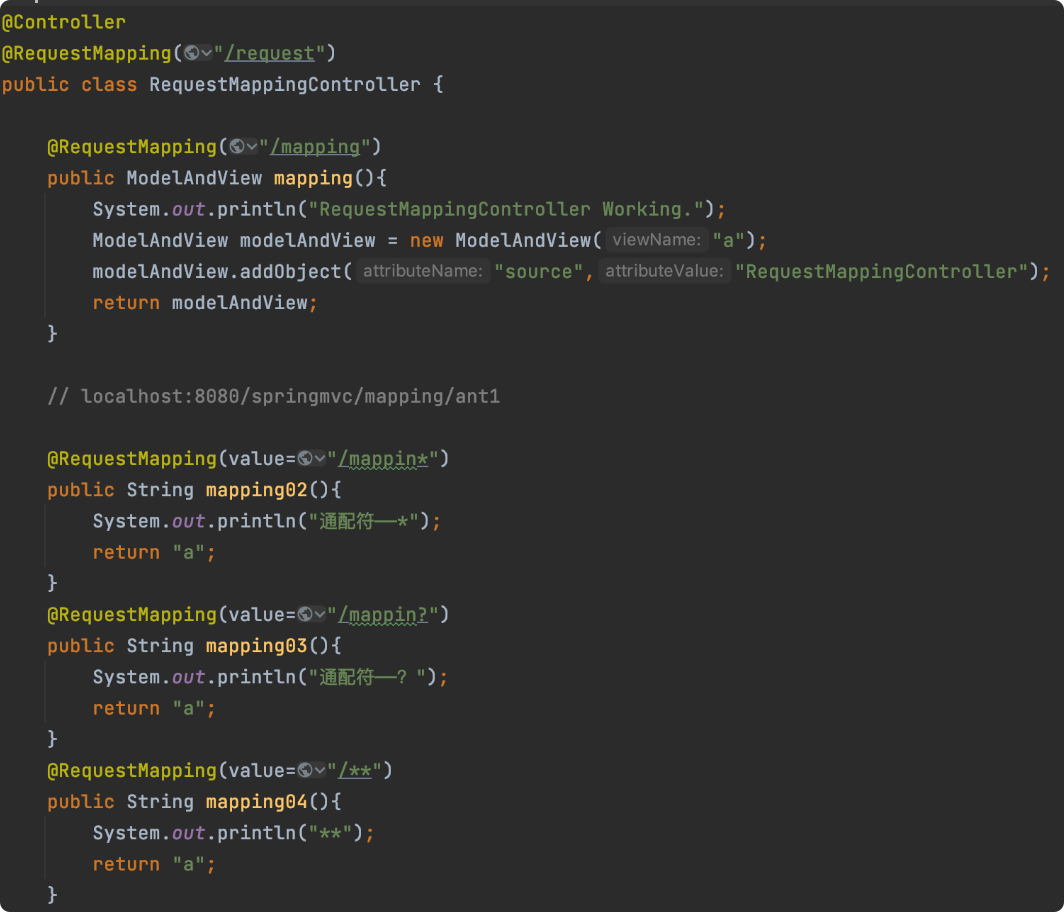
使用注解@Controller@RequestMapping
最常用也是最方便的方式就是使用注解的方式,一个类里可以处理多个请求
HandlerMapping
SpringMvc流程里,是这样的
请求 -> DisaptcherServlet -> HandlerMapping -> HandlerAdapter -> hander
不难看出走到DispatcherServlet后,通过对应HandlerMapping找到适合的处理链路HandlerExecutionChain(包含处理器对象和处理器拦截器),然后使用HandlerAdapter处理请求,这里HandlerMapping可以看作是controller,所以,我们可以通过Adapter进行。
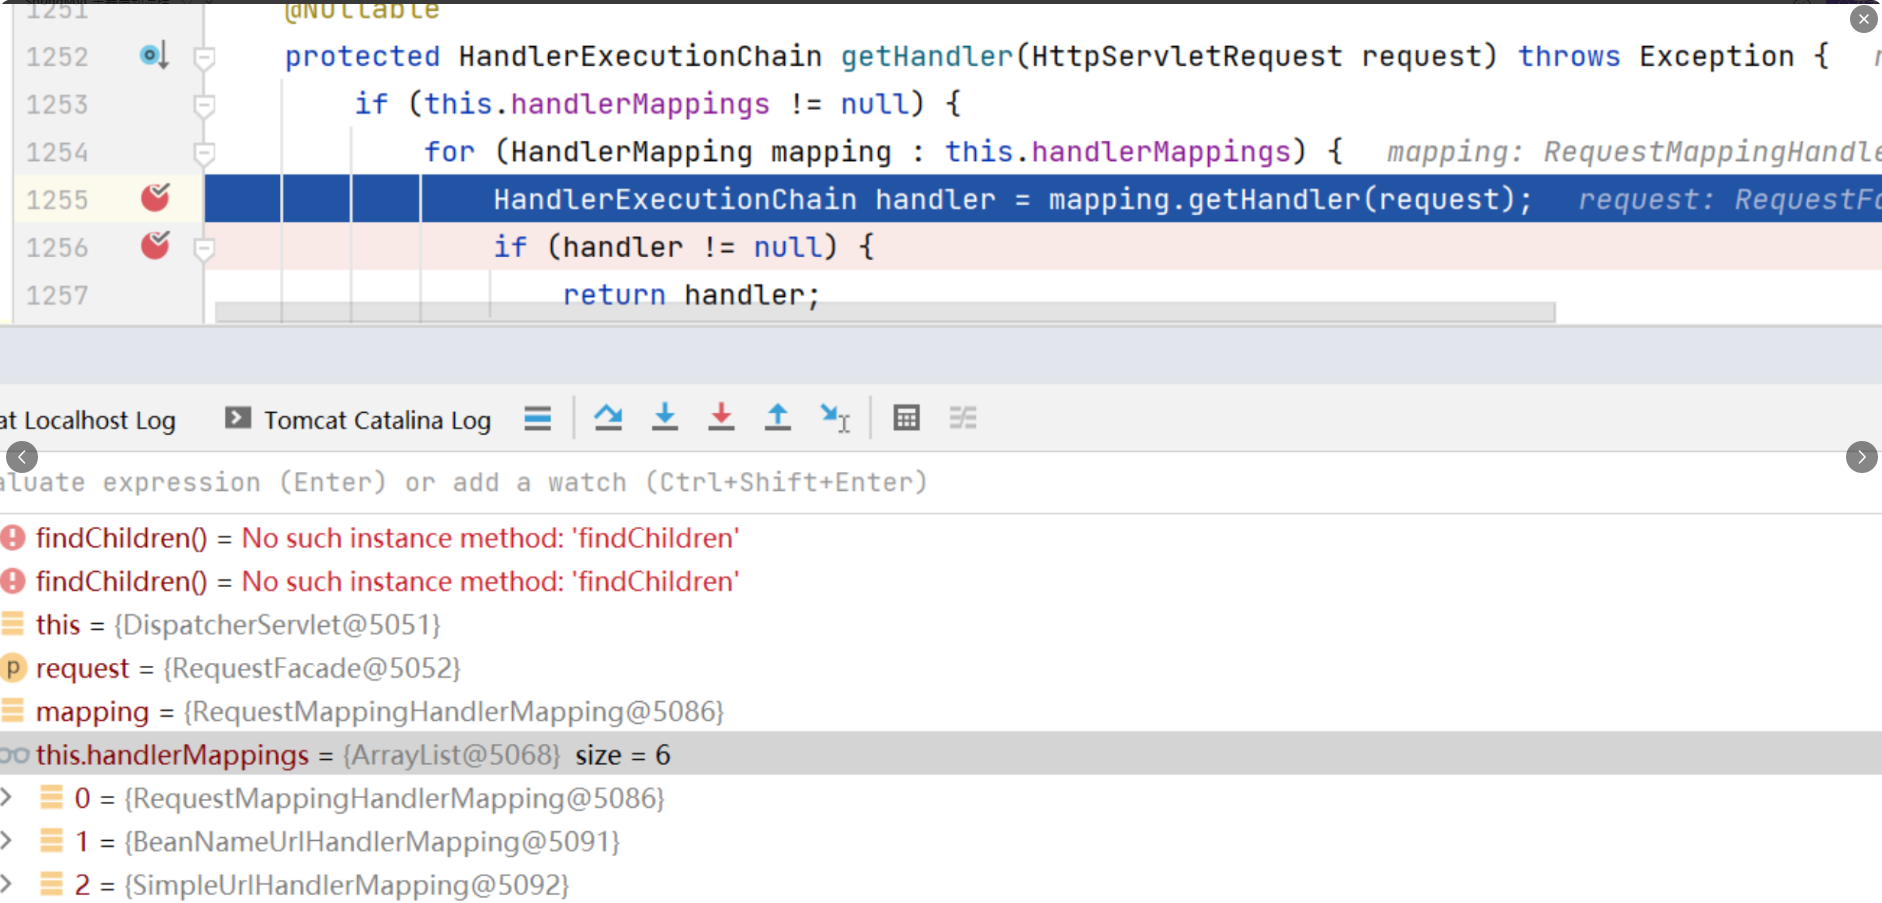
从图中可以看到它获取到了3种类型的HandlerMapping:
RequestMappingHandlerMapping
BeanNameUrlHandlerMapping
SimpleUrlHandlerMapping
RequestMappingHandlerMapping
当我们使用@Controller是,就会被它进行扫描到。
当启动应用时,初始化spring容器,会走到回调函数:
org.springframework.web.servlet.mvc.method.annotation.RequestMappingHandlerMapping#afterPropertiesSet
然后走到父类:
org.springframework.web.servlet.handler.AbstractHandlerMethodMapping#initHandlerMethods
protected void initHandlerMethods() {
        // 获得所有候选beanName—— 当前容器所有的beanName
        for (String beanName : getCandidateBeanNames()) {
            if (!beanName.startsWith(SCOPED_TARGET_NAME_PREFIX)) {
                // *处理候选bean——即解析@RequestMapping和映射路径
                processCandidateBean(beanName);
            }
        }
        // 解析完所有@RequestMapping的时候调用
        handlerMethodsInitialized(getHandlerMethods());
}getCandidateBeanNames()该方法会获取到IOC容器中的beanName,然后通过processCandidateBean(beanName)对controller进行解析,看一下内部方法:
    protected void processCandidateBean(String beanName) {
        Class<?> beanType = null;
        try {
            // 获取class
            beanType = obtainApplicationContext().getType(beanName);
        }
        catch (Throwable ex) {
            // An unresolvable bean type, probably from a lazy bean - let's ignore it.
            if (logger.isTraceEnabled()) {
                logger.trace("Could not resolve type for bean '" + beanName + "'", ex);
            }
        }
        // 这个是判断是否是一个Controller
        if (beanType != null && isHandler(beanType)) {
            detectHandlerMethods(beanName);
        }
    }
判断条件就是存在:@Controller@RequestMapping,这里要注意,下面判断是 ||前提是标注有@RequestMapping的bean是能被spring扫描到的,@Controller是本时包和一个@Component所以之间判断是没有问题的。
然后看一下解析处理器的过程:
protected void detectHandlerMethods(Object handler) {
   Class<?> handlerType = (handler instanceof String ?
         obtainApplicationContext().getType((String) handler) : handler.getClass());

   if (handlerType != null) {
      Class<?> userType = ClassUtils.getUserClass(handlerType);
      Map<Method, T> methods = MethodIntrospector.selectMethods(userType,
            // 匿名函数,处理指定class和method对象
            (MethodIntrospector.MetadataLookup<T>) method -> {
               try {
                  return getMappingForMethod(method, userType);
               }
               catch (Throwable ex) {
                  throw new IllegalStateException("Invalid mapping on handler class [" +
                        userType.getName() + "]: " + method, ex);
               }
            });
      if (logger.isTraceEnabled()) {
         logger.trace(formatMappings(userType, methods));
      }
      methods.forEach((method, mapping) -> {
         Method invocableMethod = AopUtils.selectInvocableMethod(method, userType);
         registerHandlerMethod(handler, invocableMethod, mapping);
      });
   }
}
查找RequestMapping标注的方法的逻辑如下:
@Override
@Nullable
protected RequestMappingInfo getMappingForMethod(Method method, Class<?> handlerType) {
    // 如果方法上面有@RequestMapping:解析出RequestMappingInfo
    // RequestMappingInfo 是用来在请求的时候做匹对的
    RequestMappingInfo info = createRequestMappingInfo(method);
    if (info != null) {
        // 如果方法上面有@RequestMapping,看看类上面是不是有@RequestMapping
        RequestMappingInfo typeInfo = createRequestMappingInfo(handlerType);
        // 类上面也有@RequestMapping  那就合并
        // 比如 类:/user  方法:/info 合并为 /user/info
        if (typeInfo != null) {
            info = typeInfo.combine(info);
        }

        // 合并前缀   5.1新增  默认null
        // 可通过 WebMvcConfigurer#configurePathMatch 进行定制
        String prefix = getPathPrefix(handlerType);
        if (prefix != null) {
            info = RequestMappingInfo.paths(prefix).options(this.config).build().combine(info);
        }
    }
    return info;
}
@Nullable
private RequestMappingInfo createRequestMappingInfo(AnnotatedElement element) {
// 获取RequestMapping注解
RequestMapping requestMapping = AnnotatedElementUtils.findMergedAnnotation(element, RequestMapping.class);
// 获取请求调解:[可扩展], 如果有:该条件会在请求时匹对
RequestCondition<?> condition = (element instanceof Class ?
getCustomTypeCondition((Class<?>) element) : getCustomMethodCondition((Method) element));
// 如果有RequestMapping注解,封装成RequestMappingInfo
return (requestMapping != null ? createRequestMappingInfo(requestMapping, condition) : null);
}它最终找的是RequestMapping,可是,我们也用了GetMapping, PostMapping, DeleteMapping这些注解,难道还有其他方法来查找吗?
可惜不是,查看GetMapping注解定义,GetMapping被RequestMapping标注,那么相当于标注了GetMapping的方法也标注了RequestMapping,而且GetMapping的属性都通过@AliasFor注解进行关联,所以这就是使用GetMapping和使用RequestMapping一样效果的原因了。
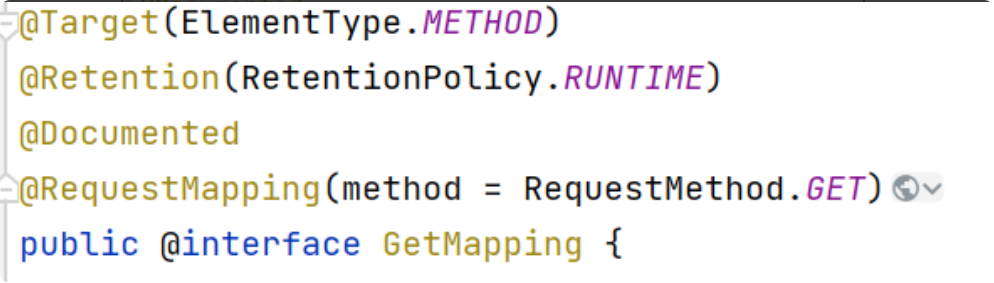
还是可以看一下它内部的MethodIntrospector.selectMethods方法逻辑,它是将方法解析出来的对象RequestMappingInfo作为value,method作为key,存入map中,
public static <T> Map<Method, T> selectMethods(Class<?> targetType, final MetadataLookup<T> metadataLookup) {
    final Map<Method, T> methodMap = new LinkedHashMap<>();
    Set<Class<?>> handlerTypes = new LinkedHashSet<>();
    Class<?> specificHandlerType = null;
    //获取原始的class对象
    if (!Proxy.isProxyClass(targetType)) {
        specificHandlerType = ClassUtils.getUserClass(targetType);
        handlerTypes.add(specificHandlerType);
    }
    //获取class的接口
    handlerTypes.addAll(ClassUtils.getAllInterfacesForClassAsSet(targetType));
    //循环我们的class集合
    for (Class<?> currentHandlerType : handlerTypes) {
        final Class<?> targetClass = (specificHandlerType != null ? specificHandlerType : currentHandlerType);

        ReflectionUtils.doWithMethods(currentHandlerType, method -> {
            //获取具体的方法对象
            Method specificMethod = ClassUtils.getMostSpecificMethod(method, targetClass);
             /**回调 即解析@RequestMapping 返回RequestMappingInfo
              * @see org.springframework.web.servlet.mvc.method.annotation.RequestMappingHandlerMapping#getMappingForMethod(java.lang.reflect.Method, java.lang.Class)*/
            T result = metadataLookup.inspect(specificMethod);
            if (result != null) {
                // 看看有没有桥接方法,泛型实现类jvm会自动生成桥接类,不知道有啥意义
                Method bridgedMethod = BridgeMethodResolver.findBridgedMethod(specificMethod);
                if (bridgedMethod == specificMethod || metadataLookup.inspect(bridgedMethod) == null) {
                    //把方法对象作为key,RequestMappingInfo对象作为value保存到map中
                    methodMap.put(specificMethod, result);
                }
            }
        }, ReflectionUtils.USER_DECLARED_METHODS);
    }

    return methodMap;
}
最有以mapping(url) 为key,注册到mapperRegistry里,内部由分了pathLookup, nameLookup, corsLookup,只有的获取handler是之间从pathLookUp中获取
SimpleUrlHandlerMapping
这里还要提一点,开篇我们对tomcat进行了简单的说明:Tomcat 启动会读取web.xml,先是读取应用的web.xml,然后将Tomcat的web.xml进行合并,而Tomcat的web.xml中配置了两个Servlet,一个是DefaultServlet,一个是JspServlt,两个分别处理静态资源和jsp页面的。
而这里SimpleUrlHandlerMapping就是处理静态资源的,这里由4个,分别是:
/css/**
/js/**
/image/**
/
前三个是对应问哦们spring-mvc.xml里配置的静态资源映射:
<!--静态资源映射-->
<!--本项目把静态资源放在了webapp的statics目录下,资源映射如下-->
<mvc:resources mapping="/css/**" location="/statics/css/"/>
<mvc:resources mapping="/js/**" location="/statics/js/"/>
<mvc:resources mapping="/image/**" location="/statics/images/"/>
<mvc:default-servlet-handler/>  <!--这句要加上,要不然可能会访问不到静态资源,具体作用自行百度-->

#SimpleUrlHandlerMapping使用方式
<bean class="org.springframework.web.servlet.handler.SimpleUrlHandlerMapping" >
        <property name="mappings">
            <props>
                <prop key="/simpleController">simpleController</prop>
            </props>
        </property>
        <property name="urlMap">
          <map>
             <entry key="simpleController5.action" value-ref="simpleController"/>
          </map>
      </property>
    </bean>
而最后一个是tomcat里的web.xml里配置的DefaultServlet拦截,作为最后一道拦截。
BeanNameUrlHandlerMapping
顾名思义,这个是将beanName作为url映射的处理器,在上面创建处理器的配置方式,已经可以理解,它是将beanName作为url拦截地址。
SimpleURLHandlerMapping和BeanNameURLHandlerMapping的父类都是org.springframework.web.servlet.handler.AbstractDetectingUrlHandlerMapping
他们都是属于通过url地址进行匹配处理器的方式,只是最后处理的对象不同,导致了出现了不同的实现
<bean class="org.springframework.web.servlet.handler.BeanNameUrlHandlerMapping"/>
#BeanNameUrlHandlerMapping使用Bean的name来配置映射路径:
<bean name="/streetName.htm" class="com.mkyong.common.controller.StreetNameController" />
总结
HandlerMapping可以归为两种方式,
扫描指定的注解作为请求处理器的标识
扫描bean,然后将beanName以
/开头的bean作为处理器
HandlerAdapter
以HandlerMapping相对应的它也有3个Adapter
RequestMappingHandlerAdapter
HttpRequestHandlerAdapter
SimpleControllerHandlerAdapter
位置:org.springframework.web.servlet.DispatcherServlet#getHandlerAdapter
它会遍历Adapter,然后通过调用adapter.supports()来判断该Adapter是否支持handler,supports()方法已经没用悬念了。
protected HandlerAdapter getHandlerAdapter(Object handler) throws ServletException {
    if (this.handlerAdapters != null) {
        for (HandlerAdapter adapter : this.handlerAdapters) {
            if (adapter.supports(handler)) {
                return adapter;
            }
        }
    }
    throw new ServletException("No adapter for handler [" + handler +
            "]: The DispatcherServlet configuration needs to include a HandlerAdapter that supports this handler");
}之后就是调用HandlerAdatper.handler反射执行,这就是它的一个主要流程。